Aluminium Extrusion Tolerances
Behind every product is a design, a design which shows how it needs to be made and how it’s going to look.

When in the design phase, before the product can go through the manufacturing process, extruders must specify tolerances and apply them to physical dimensions of the part. This is critical to the parts success as many products must be manufactured to exacting standards (Typically EN-755)
There are a few factors which will affect tolerances, these include;
- Wall thickness
- Dimension Size & Location
- Profile Type (Solid or Hollow)
- Alloy Used
- Cross Section
- The Parts Application
Manufacturers, purchasers, extruders and their customers can/will specify and agree the tolerances they wish to work to. As tolerances are measurable, aluminium profiles can be extruded to precise or standard tolerances, all of which are agreed and dependant on the manufacturer.
Understanding Tolerances
When designing aluminium profiles, you need to specify dimensions which when produced can deviate slightly from the original design. This is because dimensions are never exact, they will be as precise as ourselves or equipment can make them. Designs are limited by the accuracy of each manufacturing process the part undergoes.
What Are Tolerances?
Tolerances are limits of variation in which a part or product can be produced to.
A limit of deviation from the design is mutually agreed between the manufacturer and the customer, these deviations from the design are called tolerances.
Tolerances are put in place to let extruders know how much they can deviate from the specified dimensions for the part to work or function properly.
If these tolerances aren't agreed, customers could reject what’s extruded as manufacturers cannot guarantee that the part will be precisely extruded to the specified dimensions.
Tolerances are also put in place to protect the extruder from products being rejected by the customer.
Where Are Dimensional Tolerances Applied?
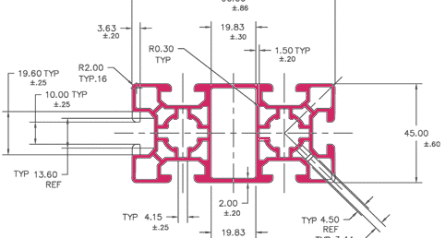
It all starts with an engineering drawing where the shape of the aluminium profile is specified by the dimensions of its cross section and delivered length.

Tolerances are shown in plus or minus (decimal) fractions of mm or percentages of a dimension.
These tolerances are applied to areas of the profile where the dimensions can deviate from the original dimension specified on the drawing. The tolerances will state the limit in which the profile can differ from the design.
All tolerances will specify the dimensions of the exact limit in which a part can be produced without it failing to function or work.
Standard Dimensional Tolerances
Industry standard tolerances were created by technical committees of The Aluminium Association, and The American National Standards Institute to consider the capabilities of both the extruders and extrusion users.
Unfortunately, when it comes to tolerances, there isn’t one rule which applies to all profiles. Tolerances have been specified and created to match the difficulty an extruder faces when controlling profile dimensions with different tolerances. This means tolerances vary with cross-sectional size, which is measured by the profile's fit within the circumscribing circle and location and location of each dimension on a complex shape.
An alloy's composition and temper also affect tolerances and are shown in the standard tolerance table.
The standard tolerance table is complex as there are many things to be taken into consideration when applying tolerances on a profile.
Aluminium extrusions are produced with dimensions accurate within hundredths of thousandths of a mm which in most cases is more than ample degree of precision.
These industry standard tolerances are regularly updated to reflect the improvements in the extruders capabilities and the changes in the users needs.
Special Tolerances
It is possible to achieve even tighter dimensional tolerances than the standard industry tolerances.
To achieve these tighter dimensional tolerances, more involved die corrections will need to be made, increased inspections will need to be carried out, slower extrusion rates to be expected and sometimes higher rejection rates too.
All of which is costlier and more time consuming.
Adjustments to the design can sometimes solve a problem that isn’t possible to achieve with dimensional tolerances, these changes can often be spotted when prototyping the profile which is one of the many benefits of having a 3D printed prototype of your design before proceeding to the manufacturing process.
If you think your profile requires special dimensional tolerances, let us know before your profile goes through the extrusion process, if these special tolerances haven’t been specified, standard tolerances will be applied so it’s best to communicate your needs right at the beginning of the process.
Conclusion
Understanding tolerances can be quite tricky as there are so many different factors and elements which affect tolerances. UK extruders are expected to work to the tolerances set by the British Standards Institution (BSI) however, they may work to their own tolerances which are within the standards set by the BSI.
Tolerances will always be agreed before your part goes through the extrusion process. If you think you require special tolerances to be applied to your profile, contact us here as we may be able to make slight adjustments to your design which will avoid you having to specify that special tolerances will be required to extrude your part.
We are able to asses your design, make adjustments, if and where needed and produce a prototype before you commit to buying a tool and putting your profile through the manufacturing process, this could save time and production costs.
Recommended Reads;
Aluminium Design Tips & Considerations
How to Calculate the Weight of Aluminium
Have you got a project you’re working on – or one coming up?
Share a few details with us and we aim to come back to you within 24 hours with tailored advice and next steps.
Fill in the form to:
Get expert guidance on the right aluminium solution for your project.
Understand lead times, options and costs.
Access product information and ideas specific to your application.
If you’ve got an aluminium project on the go (or one on the horizon), pop your details in below and we’ll help you turn your plans into a clear, actionable plan.
.png?width=150&height=70&name=BWC%20Logo%20(Custom).png)


